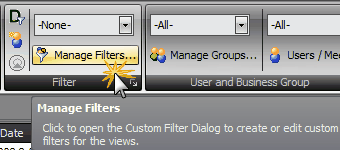
Manage Filters is a ManagePro feature which enables you to manage filters in the Views. It is available on the Ribbon Control

Before we address "Managing Filters" below, first let's describe the behavior when making selections from the filters. There are three filter drop owns on the Ribbon Control, "Select Filters', "Select Business Groups", and "User/Meeting". These filters support hyphen search which is how ManagePro displays -All- as well as -None-. For example, whenever you want to select -All- or restore your view so no filter is displayed (-None-), just click the drop down list and enter the hyphen. Doing so will quickly display -All- or -None- and prevent you from scrolling through long lists when many business groups or users lists exist.
In Managing Filters you should determine what you want to do before applying the filter because how you save the filter determines how the filter will be displayed. For example after modifying your filters the following options will be available:
Guidelines to Save Managed Filters
1.
|
Click OK if you want to only modify an existing filter and use it as a Temporary Filter; means the Custom filter is a local filter it does not sync out but it is persistent in your copy of the database.
|
2.
|
Choose Save to save changes to the existing filter; means the existing filter plus what ever was modified will be included in the filter
|
3.
|
Choose Save As to save the changes as a new filter; means the filter will be displayed as a new filter and be available in the drop down
|
To Manage Filters, follow the steps below:
1.
|
Click the Manage Filters icon on the toolbar
|
2.
|
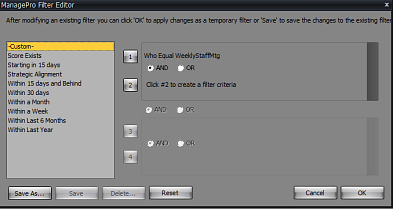
The ManagePro Filter Editor will be displayed
|
Note Whenever you select a filter in the list in this dialog, the Custom filter is copied from the selected filter and displayed in the criteria on the right-hand side..some of the filters displayed in the list below are custom filters which you may not see in your version of MP.

3.
|
Select a filter from the list
|
4.
|
The filter buttons to the right side of the list display the filters that are applied, when modifying them, click on any one of the numbers. For example click 1:
|
5.
|
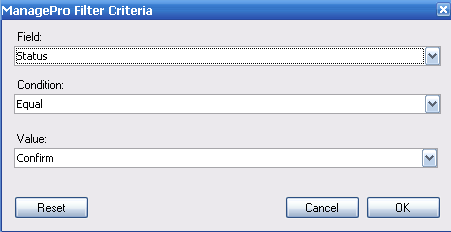
The ManagePro Filter Criteria window is displayed
|
6.
|
At this point, you can configure the filters field status if adding a new filter, or change the condition and value of the existing filter if you are modifying a filter.
|
7.
|
Click OK on the screen as shown below once you apply the filter criteria
|
If applicable, repeat steps 4- for each filter criteria associated with numbers, 2, 3, and 4
Then follow the Guidelines to Save Managed Filters described above

At anytime you can reset the filter by clicking the reset button. This restores the filter back to it's original state.
IMPORTANT NOTE: Remember, all filter changes, deletions etc (apart from the “-Custom-“ filter as noted) are synced to other users.
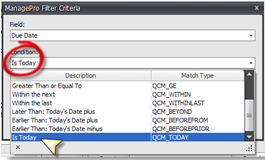
TIP: To make it easy to craft views that are defined by tasks being due or starting on today’s date use the Due Date and "Is Today" Condition
as shown below. Doing so returns a list of records that are Due Today.

|