Import Timecard Entries, Main Workspace
In the previous topic Import Timecard Entries, Timecard Tab we addressed how to import timecard entries directly into a ManagePro record while in the Goal Details Timecard Tab so that time can be posted against the selected record. Below we'll address the second method, how to import timecard entries for single and/or multiple users across multiple records in ManagePro.
We'll first address how to prepare your CSV file for import and move right into the import from there.
Preparing the CSV file for import is recommended prior to the import. It is best practice to first do an export so you can get an idea of which fields should be mapped and or deleted, also verify the "guid' numbers. A guid number is Globally Unique Identifier which is created in Mpro when records are added in the database. The "guid" number attaches itself to the record and allows you to map data to the guid number along with the title of the record. This ensures that the timecard entries will be posted against specific records.
Exporting records from ManagePro
First, export the records for which you will be importing timecard records. Navigate to the Main Workspace
In the example below, we select the records to export and then right-click and choose Export
The Excel spreadsheet will generally drop to the task bar at the bottom of screen, just click it to open
The export includes all fields in the view you are exporting from. Note the "guid" field, title, and Who field. These are fields of focus and all other columns can be deleted.

After deleting the fields, you'll want to add the following columns. These are fields associated with the timecard.
Hours: timecard entries - hours worked
Comments: description which can be used to depict the work achieved
Date: date of the timecard entry, the date the work was performed
Next modify the "Who" field with the initials of applicable users. These are users that exist in the ManagePro database and users that performed the work. Users can be found on the People and Meeting tab. If the users don't exist, you must add them prior to the import otherwise the user id which maps to the initials field will be left blank. If this happens, you can always add the users after the import and assign the timecard entries but this really defeats the purpose.
When the CSV file is complete, it might look something like the screen capture below. Generally speaking, asterisks and commas are not always handled well with imports so you'll notice below that they were removed and we recommend you do the same.
Based on the example below, we'll expect 2 hours to be imported to each of the goals for each user listed along with the date the work was performed, and related comments.

Once the Excel spreadsheet is complete, save it as a CSV file.
Now we are ready for the import. Back in ManagePro on the Workspace View, right-click anywhere in the title field area and select Timecard CSV file.

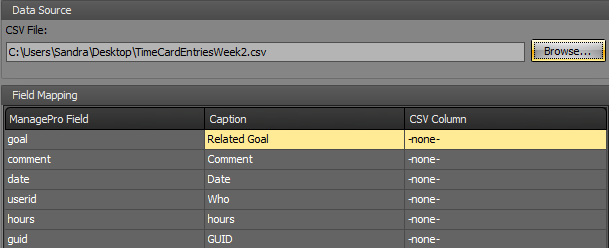
On the Import ManagePro Items from CSV file, click "Browse" to navigate to the location of the CSV file being used for the import.

Doing so enables the field mapping

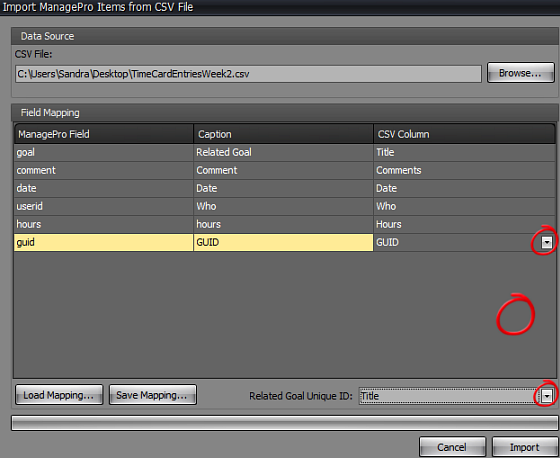
One the screen above there are three columns:
1. |
ManagePro Field: SQL database field name |
2. |
Caption: displayed in Mpro which could be the same as the SQL database field name or a name which was customized by the Mpro Administrator. |
3. |
CSV Column Field headers in the CSV file |
Here's what the mapping looks like. Notice, "title" is select for the "Related goal unique ID" Title must also be selected. If you map the fields in the CSV file using the screen capture below as your guide, your import will be successful.

• |
Once the mapping is complete, the mapping can be saved which is useful if you will be using the same mapping for future timecard entry imports. Doing so will allow you to load the saved mapping. |

• |
Click Import to initiate the import process |

• |
The import process will start and begin to load the entries |

Once the import process is complete, check any of the records details timecard tab and validate the entries were imported. We'll check one of the property records used in the example above.

Here's another screen capture with the imported entries
