You can select which columns in a View to include in the quick report. We found that users often don't need all of the columns in a view they are using to generate a quick report. So, Select Layout option allow you to select which columns you want, then save your modified layout as a standard report configuration you can use over and over.
You can remove or add columns to the report using the Layout window that pops up when you click "Configure". This does not change the column configuration in the View, just the report.
To Use the Select Layout Option follow the instructions below:
1.
|
First go to the View you plan to Print
|
2.
|
Right-Click and Select Print|Quick Report option
|
3.
|
Once at the Quick Report Print Options Dialog, make your Display and Related Data Option selections
|
4.
|
Click the Configure Button
|

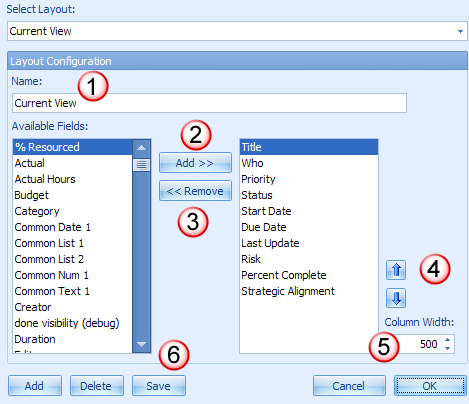
The numbers in the screenshot below represent the steps to configure your View, some are optional.
1: Name the View
2. Add columns from the left to right
3. Remove columns from the right to left
4. Arrange the columns in the order to which you would like them displayed
5. Choose your column width
6. Save

Click OK. By doing so, you will go back to the Quick Report Print Options window
From there, click OK to run your report to Print Preview

To access your saved View Layout, follow steps 1-4 above then Select your layout from the Select Layout drop down.

To delete a saved view, Select the View from the Select Layout drop down and click Delete
|